
What is File Manager?
File Manager is our new web based FTP client of choice. It functions no different to our old web based FTP client, Webshell, but is more modern and streamline, with us believing it to be the best choice going forward.
You can access File Manager by the following links:
Sheffield: https://files-sheffield.pipeten.co.uk/
Derby: https://files-derby.pipeten.co.uk/
Which link you need to visit will depend on which location your host server resides, corresponding with the above.
Logging into File Manager
- Locate the FTP details you’ll need to connect to the server. These are:
- FTP Username (This can be different or shorter than your control panel username).
- FTP Password (This is by default the same as your control panel password but if modified will be different).
- FTP Host name (This is the server/host name on which your account resides).
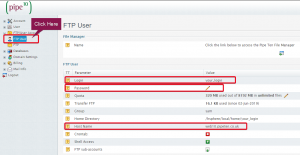
The main FTP account details were sent with your welcome email after sign-up, but you can also find these details from within the control panel by navigating to FTP/User Account > FTP User as shown below. You can also reset your FTP Password from the same location or by following these FTP password reset instructions.
2. Log in to your FTP account using your details when prompted by the window below.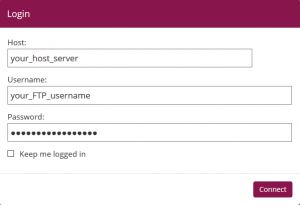
Uploading Files/Folders
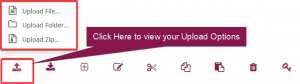
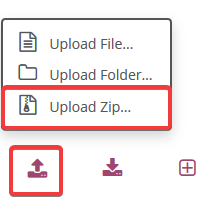
- Click the icon at the bottom left shown below in order to bring up a menu where you can select whether you wish to upload a file, a folder or a zip.
2. When clicking on the option you are wishing to use, it should open your default file browser on your current device. For example, Windows File Explorer will appear on a device operating on the Windows operating system.
3. Click on the file you wish to upload. You should then be greeted by a File Transfer window, which will show you the progress of your file upload process. Once this has been completed, the file should then appear in the directory you have uploaded it to if successfully uploaded.
![]()
Downloading Files/Folders
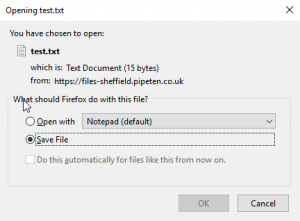
1. Select the file you wish to download and then click the icon at the bottom left shown below. This will bring up a menu where you can choose where to download the file to. What you see may vary between different web browsers. Shown below is what you may see within Firefox.
2. Once you’ve chosen where to save the file, it should begin the download and can be seen within your browser’s usual download manager.
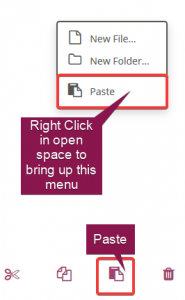
Cutting/Copying/Pasting a File
1. Select the file you wish to cut/copy/paste using Left Click. You can also choose to Right Click it and bring up the menu with the choice to Cut/Copy the file.
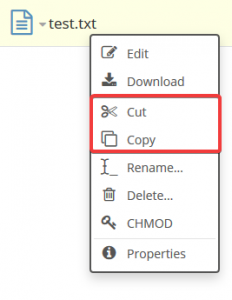
2. You can also choose to use the icons at the bottom after selecting a file.

3. Once you’ve cut/copied using your chosen method, you can then paste by right clicking and clicking Paste, or by clicking the Paste icon on the bottom toolbar.
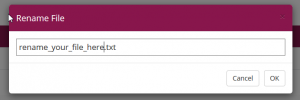
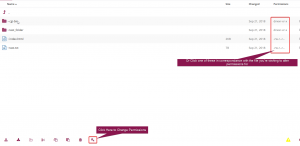
Renaming a File/Folder
1. Right click on a file you wish to change the name of and then select the Rename option from the choices that appear.
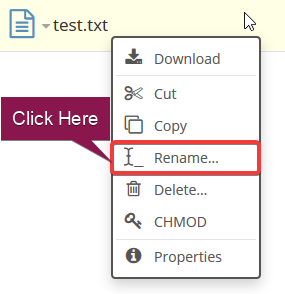
2. Type the new name you wish to give the file in the appropriate field and then click OK. Your file should now appear as the new name if the renaming was successful.
Creating a New File/Folder
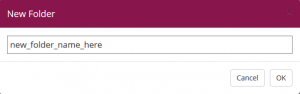
- Right click away from any files to bring up the right click menu and select either New File or New Folder, or click on the icon shown in the image below and select the option you’re wanting to use.
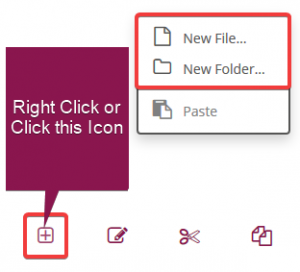
2. Click OK once you have inputted your new file/folder name in the appropriate field and then your file/folder should be created successfully.
Deleting a File/Folder
1. Select the file/folder you are wanting to delete.
2. You can either right click and choose the Delete option, or click the icon at the bottom of the page shown below.
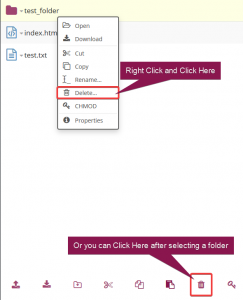
3. Click Confirm if you have selected the right file/folder you wish to delete.

Changing File/Folder Permissions
Note: This can only be done if you’re on a Linux Hosting Plan.
- Select the file/folder you wish to alter permissions for and click the CHMOD icon, or click on the permissions in the Permissions section that lines up with your file/folder, as shown below:
2. You’ll then be greeted by this window, where you can proceed to alter the permissions to what you wish.
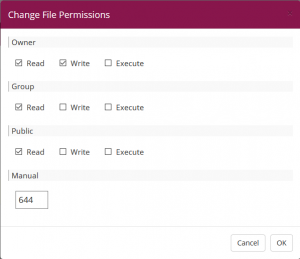
3. Once you have chosen the permissions you want to keep, simply click OK and they should be set. You can check this by the letter sequence shown in the Permissions section.
Viewing File Properties
1. Either Left Click on the file name or Right Click in line with the file to bring up the menu. Once you have done so, you should then be able to click on Properties, as shown below.
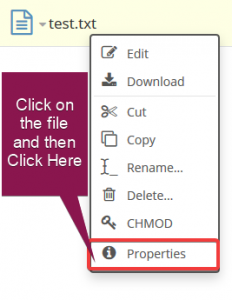
2. You’ll then be greeted by a window which should show the selected file’s Properties.

Sorting by Size
1. In order to sort files and folders based on their size, you can use the Size column. Simply click on the name of the column and it will organise the files in ascending or descending order depending on which way the arrow is facing next to the column name. To change between ascending and descending, simply click the name until you have your preference.

Editing a File
- Find the file you want to edit and either click on it to bring up the menu, then click Edit, or click the Editor icon at the bottom of the page when you have highlighted the file.

- You’ll then be greeted by the editor window, where you can make changes to your file and then save them by clicking Save.
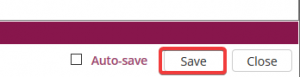
3. Once you’ve saved the file, you should be okay to close the window.
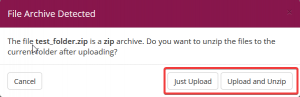
Uploading and Extracting .zip Files
- Click on the Upload icon at the bottom left of the screen and then click on the Upload Zip option. Once you have done so, find the .zip file you wish to upload and double click it.
2. You’ll be given the option to either just upload the file, or to unzip it upon upload. Choose whichever option is your preference.
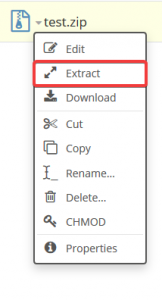
3. If you decide you wish to unzip the file when it is already on the server, simply click on it and select the Extract option. If successful, you will see your files listed in the directory where the zip file was originally located.
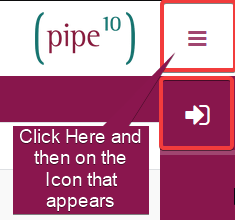
Logging Out of File Manager
- Click on the menu icon at the top right of the page. This should then bring up a sidebar down the right hand side where you will need to click on the Icon shown.
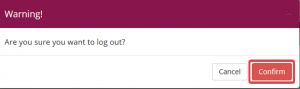
2. You’ll then be greeted by this window asking you if you’re sure you want to log out. Click on Confirm if this is the case.
3. You’ll then be shown the log in window to log in again upon successfully logging out.

Classification: Public
Last saved: 2021/05/13 at 13:11 by Jamie