
Logging Errors Using NGINX
Password Protecting Directories or Single Files Using NGINX
Canonical (preferred) 301 redirect with NGINX
Setting a New Document Root with NGINX
Redirecting HTTP to HTTPS using NGINX
Blocking referrer link spam with NGINX
Using NGINX to Block IP Addresses
Enabling Gzip with NGINX
Leverage Browser Caching with NGINX
Removing File Extensions using NGINX
Stop Image Hot-Linking with NGINX
Block Spidering using NGINX
Implementing Custom Error Message Pages for NGINX
Protecting WP-Admin with NGINX
Enable/Disable Directory Browsing using NGINX
Changing PHP Memory Limits using NGINX
This guide has been written to help provide you with useful code/configuration changes. All of the below steps were performed on a CentOS 7 self-managed server with a basic LEMP stack setup as per our LEMP stack guide. It is assumed you have already installed NGINX and setup a server block in your configuration file for your website/s.
Remember to always test your syntax before restarting NGINX using the following command:
nginx -t
If correct, you should see a message similar to the following:
nginx: the configuration file /etc/nginx/nginx.conf syntax is ok
nginx: configuration file /etc/nginx/nginx.conf test is successful
Upon receiving this message, you should be okay to restart NGINX.
sudo systemctl restart nginx
Logging Errors Using NGINX
Your site’s PHP errors are automatically sent to your NGINX error log by default. You should be able to find where this is located by accessing your yourdomain.co.uk.conf file and looking under the error_log part of your site’s NGINX config file.
The full path will be similar to that shown below:
server {
access_log /home/your_user/_logs/access-yourdomain.co.uk.log;
error_log /home/your_user/error-yourdomain.co.uk.log;
}
You will have set these up already if you followed our NGINX LEMP guide.
To ensure your NGINX configurations are correct before restarting, you should run the syntax checker below and receive a similar message to the following.
nginx -t
nginx: the configuration file /etc/nginx/nginx.conf syntax is ok
nginx: configuration file /etc/nginx/nginx.conf test is successful
You should then be safe to restart NGINX to begin testing.
sudo systemctl restart nginx
Password Protecting Directories or Single Files Using NGINX
When it comes to password protecting single files or directories using NGINX, you’ll need to use a set of tools linked with Apache. These will either be httpd-tools (CentOS/RHEL) or apache2-utils (Ubuntu/Debian). You can install the tools on CentOS 7 using the command below.
sudo yum install httpd-tools -y
Once this has been installed, you should be able to use the htpasswd utility to create a Basic Auth user and password to protect the location you want to specify.
sudo mkdir /etc/apache2
sudo htpasswd -c /etc/apache2/.htpasswd your_login
You’ll be prompted to input a password for the user upon inputting the above command.
The -c flag here is to trigger the creation of the file, so if you’re wishing to add a new login and password to the file, you’d simply remove the -c flag since the file already exists.
sudo htpasswd /etc/apache2/.htpasswd your_login2
Once you’ve added all of your users/logins, you can view whether they have been added correctly using the below.
cat /etc/apache2/.htpasswd
sam1:$apr1$1SUUaxEI$eYAfssvuDkfRvMnx2kl301
sam2:$apr1$gxDivtso$nLRhokOZS/9COTiG2HqLx0
You can see the passwords have been hashed using the MD5 algorithm highlighted by the $apr1$ which Apache uses. Apache supports 5 different formats for basic authentication.
Once you have generated the .htpasswd file to store your users and passwords for basic authentication, you should be okay to move onto adding the required code to your site’s NGINX configuration file.
Single File Basic Authentication
location ^~ /path_to/your_file.txt {
auth_basic "No Access Permitted";
auth_basic_user_file /etc/apache2/.htpasswd;
}
Single Directory Basic Authentication
location ^~ /your_directory {
auth_basic "No Access Permitted";
auth_basic_user_file /etc/apache2/.htpasswd;
}
Website’s Root Basic Authentication
Please note: You may already have an existing location / { } block to place this into. You cannot have duplicates in the same server block.
location / {
auth_basic "No Access Permitted";
auth_basic_user_file /etc/apache2/.htpasswd;
}
To ensure your NGINX configurations are correct before restarting, you should run the syntax checker below and receive a similar message to the following.
nginx -t
nginx: the configuration file /etc/nginx/nginx.conf syntax is ok
nginx: configuration file /etc/nginx/nginx.conf test is successful
You should then be safe to restart NGINX to begin testing.
sudo systemctl restart nginx
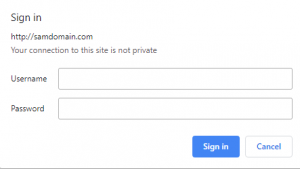
When visiting the location you have added basic authentication to, you should be prompted to input a user’s credentials from your .htpasswd file. If the details you input are correct, you’ll gain access to the location. If not, you’ll receive a 401 status code. You can see an example of what you should see below. This may look different depending on which web browser you’re using.
Canonical (preferred) 301 redirect with NGINX
Redirects can be useful for sending the end-user from one location to another. When the redirects are set as permanent, they will provide the HTTP status code 301.
The redirect can be performed with a line of code added to your site’s NGINX config file, as shown below.
yourdomain.co.uk.conf
server {
server_name yourdomain1.co.uk;
rewrite ^/(.*)$ http://yourdomain2.co.uk/$1 permanent;
}
The ^/(.*)$ expression specified before the URL in the server block above ensures everything after the / in the URL will end up being the same location you’re redirected to. For example. http://yourdomain1.co.uk/index.php will redirect you to the same location of /index.php on the other site (http://yourdomain2.co.uk/index.php) when entered in your web browser.
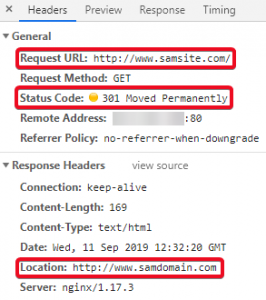
You can check it’s performing correctly by comparing the request and response headers in your web browser:
If you’re wishing to ensure your visitors don’t end up visiting pages that have now been moved/don’t exist anymore (404 Not Found) it would be best to put in a redirect to the new page’s location. You can see an example of how to do this below.
yourdomain.co.uk.conf
server {
server_name yourdomain.co.uk www.yourdomain.co.uk;
rewrite ^/products.html$ /newprices.html permanent;
}
So this would redirect anyone who visits http://yourdomain.co.uk/products.html to http://yourdomain.co.uk/newprices.html and prevent them from receiving a 404 error when trying to visit the old ‘products’ page.
To ensure your NGINX configurations are correct before restarting, you should run the syntax checker below and receive a similar message to the following.
nginx -t
nginx: the configuration file /etc/nginx/nginx.conf syntax is ok
nginx: configuration file /etc/nginx/nginx.conf test is successful
You should then be safe to restart NGINX to begin testing.
sudo systemctl restart nginx
Setting a New Web Root with NGINX
The root directory for your site can be specified within your site’s NGINX configuration file. It will be the default location that is loaded when visiting your site in a web browser. An example of a web root being specified can be seen below.
yourdomain.co.uk.conf
server {
server_name yourdomain.co.uk www.yourdomain.co.uk;
root "/home/your_user/yourdomain.co.uk";
index index.php;
}
Here, you can see the document root is set to /home/your_user/yourdomain.co.uk. This means all the files here will be what are accessed when visiting http://yourdomain.co.uk in your web browser. You can also see how to specify the index to load as (/index.php) in the example above.
To change your web root, all you need to do is change the path specified here to the path of your new web root.
To ensure your NGINX configurations are correct before restarting, you should run the syntax checker below and receive a similar message to the following.
nginx -t
nginx: the configuration file /etc/nginx/nginx.conf syntax is ok
nginx: configuration file /etc/nginx/nginx.conf test is successful
You should then be safe to restart NGINX to begin testing.
sudo systemctl restart nginx
Redirecting HTTP to HTTPS with NGINX
With NGINX, you can specify separate server blocks within your configuration file which can be used to listen on different ports of your server. It is standard practice when it comes to an NGINX web server to have two different server blocks for HTTP and HTTPS. One should be listening on port 80 for HTTP requests and one listening on port 443 for HTTPS requests. You can see a basic example of a server block listening on port 80 below, which is told to redirect site visitors to https:// when they try to go to the http:// version of your site.
Please Note: This configuration may differ greatly to your current NGINX site configuration. This example is a guideline only.
yourdomain.co.uk.conf – port 80
server {
listen 80;

server_name yourdomain.co.uk www.yourdomain.co.uk;
return 301 https://$host$request_uri;
}
yourdomain.co.uk.conf – port 443
server {
listen 443 ssl;
server_name yourdomain.co.uk www.yourdomain.co.uk;
root /home/your_user/yourdomain.co.uk
index index.php

# Paths to your SSL certificate and Private Key
ssl_certificate /path/to/your/certificate/yourdomain.co.uk.pem;
ssl_certificate_key /path/to/your/private/key/yourdomain.co.uk.key;

}
To ensure your NGINX configurations are correct before restarting, you should run the syntax checker below and receive a similar message to the following.
nginx -t
nginx: the configuration file /etc/nginx/nginx.conf syntax is ok
nginx: configuration file /etc/nginx/nginx.conf test is successful
You should then be safe to restart NGINX to begin testing.
sudo systemctl restart nginx
This section of code is particularly useful when you have just had an SSL certificate installed.
Without this code, your site’s visitors will most likely be sent to the http:// version of your site, meaning they’ll get notified their connection still isn’t secure despite the site having an SSL certificate installed.
One of the reasons to redirect your visitors over to HTTPS is due to Google now using this as a ranking indicator. We cover this in greater detail in our Google’s SSL ranking blog post.
Using HTTPS also provides visitors with another layer of security, encrypting their communication with the website. This is highly recommended when the data being sent to your website needs to be handled in a secure way. Examples of sensitive data that needs to be handled securely include things such as bank account details and login details, which will need to be encrypted to help try and prevent potential attackers from gaining unauthorised access to them.
Blocking Referrer Link Spam with NGINX
You can block referrer spam on your websites by using a .conf file and including it globally in your main NGINX configuration file. Referrer spam is often used to try and promote sites by trying to ensure it shows up in your logs and analytics in hopes you visit their link/page out of curiosity.
To block them, you’ll first need to create a file to store the referrers in that can be called on when needed.
touch /etc/nginx/referral-spam.conf
Now you have created the file, you’ll need to tell NGINX to include the file in its configuration. Add the below to your main NGINX configuration file’s http{ } block (most likely found in /etc/nginx/nginx.conf).
http {
include referral-spam.conf;
}
Open the referral-spam.conf file and add the following, replacing the example ‘bad referrer’ below with the link that is causing issues. You can add as many referrers to this list as you wish in a similar format, as long as they are between the specific map{ } block.
map $http_referer $bad_referer {
default 0;

"~*examplebadreferrer\.co.uk" 1;

}
After doing the above, you’ll need to also tell your site’s configuration what to do when it is visited by one of the referrers in the referral-spam.conf file. The below code will need adding to yourdomain.co.uk.conf if you’re wishing to block referrers there. It is telling NGINX to use the 444 status code (connection closed without response), meaning the referrer will not be responded to by the server and dealt with appropriately.
server {
if ($bad_referer) {
return 444;
}
}
To ensure your NGINX configurations are correct before restarting, you should run the syntax checker below and receive a similar message to the following.
nginx -t
nginx: the configuration file /etc/nginx/nginx.conf syntax is ok
nginx: configuration file /etc/nginx/nginx.conf test is successful
You should then be safe to restart NGINX to begin testing.
sudo systemctl restart nginx
Using NGINX to Block Requests via IP/Hostname
You can block requests to any of your website’s files/directories using NGINX’s ngx_http_access module. The syntax is quite simple to understand and uses your location { } blocks to help specify where you would like to deny access to. The IP addresses below are just examples and will need to be replaced with the ones you wish to block. You will need to add these to your site’s configuration file.
Blocking Access to your Website’s Root Directory
location / {
deny 192.168.1.254;
deny 192.168.1.0/24;
deny hostname;
}
Blocking Access to Specific Directories
location /yourdirectory {
deny 192.168.1.254;
deny 192.168.1.0/24;
deny hostname;
}
Blocking Access to Specific Files
location /path/to/yourfile.php {
deny 192.168.1.254;
deny 192.168.1.0/24;
deny hostname;
}
To ensure your NGINX configurations are correct before restarting, you should run the syntax checker below and receive a similar message to the following.
nginx -t
nginx: the configuration file /etc/nginx/nginx.conf syntax is ok
nginx: configuration file /etc/nginx/nginx.conf test is successful
You should then be safe to restart NGINX to begin testing.
sudo systemctl restart nginx
Enabling Gzip with NGINX
NGINX can perform compression using the gzip directive. Below you can see the code that needs to be added to your site’s configuration file to enable gzip compression. Please Note: This is a very basic example and will not provide compression for everything you need it to, it is just a guideline.
server {
gzip on;
gzip_types text/plain ;
gzip_min_length 1000;
}
The gzip_types directive can be used to specify additional MIME-types you wish to compress before sending responses to clients. You just need to list them after the text/plain example provided. You can use the gzip_min_length directive to specify the minimum length of your site’s response to compress, with the default set above being 1000 (20 bytes).
To ensure your NGINX configurations are correct before restarting, you should run the syntax checker below and receive a similar message to the following.
nginx -t
nginx: the configuration file /etc/nginx/nginx.conf syntax is ok
nginx: configuration file /etc/nginx/nginx.conf test is successful
You should then be safe to restart NGINX to begin testing.
sudo systemctl restart nginx
Leverage Browser Caching with NGINX
You can add some code into a location { } block in your site’s configuration file to specify how long you wish site visitor’s browsers to store certain assets in their cache. This will help increase site speed and end-user’s satisfaction thanks to them not having to download static assets from the server every time they visit your site.
location ~* \.(jpg|jpeg|png|gif|ico|css|js)$ {
expires 7d;
}
The code above instructs the user’s browsers to store assets of the file types listed for 7 days in their cache. You can customise this to your liking dependent on how often changes are made to the assets of your site.
To ensure your NGINX configurations are correct before restarting, you should run the syntax checker below and receive a similar message to the following.
nginx -t
nginx: the configuration file /etc/nginx/nginx.conf syntax is ok
nginx: configuration file /etc/nginx/nginx.conf test is successful
You should then be safe to restart NGINX to begin testing.
sudo systemctl restart nginx
Removing File Extensions Using NGINX
The code below can be used to permit the access of .html or .php files just via their file name without the extension. For example, instead of having to visit https://yourdomain.co.uk/index.php in your browser, you could visit the exact same page using https://yourdomain.co.uk/index instead. You’ll need to add the below code to your site’s NGINX configuration in the appropriate location { } blocks.
location / {
try_files $uri $uri.html $uri/ @extensionless-php;
index index.html index.htm index.php;
}

location ~ \.php$ {
try_files $uri =404;
}

location @extensionless-php {
rewrite ^(.*)$ $1.php last;
}
To ensure your NGINX configurations are correct before restarting, you should run the syntax checker below and receive a similar message to the following.
nginx -t
nginx: the configuration file /etc/nginx/nginx.conf syntax is ok
nginx: configuration file /etc/nginx/nginx.conf test is successful
You should then be safe to restart NGINX to begin testing.
sudo systemctl restart nginx
Stop Image Hotlinking NGINX
Hotlinking can be used to grab an image from anywhere on the internet and show it on a site by using the image’s current URL. The exact URL will be referencing the original images location, which means it’ll be served from an external source to the hotlinking site from wherever the image is located. The most likely source would be other people’s websites.
Despite this sounding convenient for the person performing the hotlinking and it seeming harmless, it actually comes with a lot of issues. For example, if you’re hotlinking to copyrighted content, it could become a legal matter. The hotlinking also uses up the resources where the content is originally served from, so you could inadvertently be increasing traffic to the server where the hotlinked image is located on, potentially causing huge issues for whoever the image is sourced from.
You can prevent image hotlinking on your site by adding the following code/location { } block to your site’s NGINX config file.
location ~ .(gif|png|jpeg|jpg|svg)$ {
valid_referers none blocked ~.google. ~.bing. yourdomain.co.uk *.yourdomain.co.uk;
if ($invalid_referer) {
return 403;
}
}
This prevents all files under the extension .gif, .png, .jpeg, .jpg and .svg from being hotlinked by ensuring only Google, Bing (to show your images in search engines) and yourdomain.co.uk (and its subdomains) can be referrers to your media content. If you wish to add more file types, simply pipe them in ( | ) within the brackets. Any referrers not in the valid_referrers list will be shown a 403 unauthorised code, meaning hotlinking will have been prevented successfully.
To ensure your NGINX configurations are correct before restarting, you should run the syntax checker below and receive a similar message to the following.
nginx -t
nginx: the configuration file /etc/nginx/nginx.conf syntax is ok
nginx: configuration file /etc/nginx/nginx.conf test is successful
You should then be safe to restart NGINX to begin testing.
sudo systemctl restart nginx
Block Spidering using NGINX
Adding this code to your NGINX config is a very good way to prevent bots/crawlers from taking up your bandwidth/traffic limits. Leaving them unmonitored could cost you a hefty bill if not dealt with promptly. Blocking bad bots/crawlers is also a good security practice to ensure your site isn’t being crawled for vulnerabilities, as well as other information that can be used maliciously. This includes things such as email addresses, phone numbers and vulnerable form URLs.
Below you can find an if() statement which uses user agents to block bad bots. Although if() statements are usually frowned upon when used in NGINX location context, they’re fine most of the time if they only contain return or rewrite directives.
if ($http_user_agent ~* (badbot0|badbot1|badbot2|badbot3) ) {
return 444;
}
Here the statement is essentially saying if the user agent visiting the site is named any of these names provided, close the connection without a response (444 HTTP response code).
You can add further bots onto the list by piping them in ( | ) between the brackets already holding existing names. It is highly recommended that you look for a large list of well known bad bots and use this for your site as there are many out there that could eventually end up crawling your site with malicious intent.
To ensure your NGINX configurations are correct before restarting, you should run the syntax checker below and receive a similar message to the following.
nginx -t
nginx: the configuration file /etc/nginx/nginx.conf syntax is ok
nginx: configuration file /etc/nginx/nginx.conf test is successful
You should then be safe to restart NGINX to begin testing.
sudo systemctl restart nginx
Implementing Custom Error Messages for NGINX
Custom error messages are useful for keeping your users informed rather than displaying a generic error message like NGINX usually would. You can create custom error messages for your site and ensure NGINX displays these to end-users if there are any issues.
First, you’ll need to specify a custom error page for your HTTP status codes linked to errors. You can do this by adding the following code to your site’s server { } block in its NGINX configuration file.
error_page 400 401 402 403 404 405 406 407 408 409 410 411 412 413 414 415 416 417 418 421 422 423 424 426 428 429 431 451 500 501 502 503 504 505 506 507 508 510 511 /error.html;
Then you’ll need to specify a location { } block for your error.html page and ensure it can only be requested internally.
location = /error.html {
ssi on;
internal;
}
After this, you’ll then need to create the error.html that is being used for all of your error codes. This will need to be in your web root for your site.
vim /home/your_user/yourdomain.co.uk/error.html
Paste in the following, adding your site name and save.
<!DOCTYPE html>
<html>
  <head>
    <meta charset="utf-8">
    <title>Your_Site_Name</title>
  </head>
     <body>

<h1><!--# echo var="status" default="" --> <!--# echo var="status_text" default="Something went wrong" --></h1>

     </body>
</html>
Since you’ve added a status_text variable here that isn’t set anywhere currently, you’ll need to add this to ensure your error messages respond correctly. You can do this using a map { } block and adding it under your http { } directive within your default NGINX configuration file (most likely in /etc/nginx/nginx.conf).
map $status $status_text {
400 'Bad Request';
401 'Unauthorized';
402 'Payment Required';
403 'Forbidden';
404 'Not Found';
405 'Method Not Allowed';
406 'Not Acceptable';
407 'Proxy Authentication Required';
408 'Request Timeout';
409 'Conflict';
410 'Gone';
411 'Length Required';
412 'Precondition Failed';
413 'Payload Too Large';
414 'URI Too Long';
415 'Unsupported Media Type';
416 'Range Not Satisfiable';
417 'Expectation Failed';
418 'I\'m a teapot';
421 'Misdirected Request';
422 'Unprocessable Entity';
423 'Locked';
424 'Failed Dependency';
426 'Upgrade Required';
428 'Precondition Required';
429 'Too Many Requests';
431 'Request Header Fields Too Large';
451 'Unavailable For Legal Reasons';
500 'Internal Server Error';
501 'Not Implemented';
502 'Bad Gateway';
503 'Service Unavailable';
504 'Gateway Timeout';
505 'HTTP Version Not Supported';
506 'Variant Also Negotiates';
507 'Insufficient Storage';
508 'Loop Detected';
510 'Not Extended';
511 'Network Authentication Required';
default 'Something went wrong';
}
The strings specified after the response codes are the messages your visitors will see when receiving one of the above responses. You can change these to whatever you wish. The messages already in place above can be used to accurately summarise what error is actually occurring. Your site’s visitors can then pass these messages onto you to help you troubleshoot the issue if needed.
To test the above is working as expected simply create a test file to visit within your website’s root directory.
touch /home/your_user/yourdomain.co.uk/test.html
Then simply ensure when the file is called upon in a browser that it returns the specific error code you’re wanting to test the message for. You can do this using your site’s NGINX configuration file. The code used to test a 451 status code with the message ‘451 Unavailable For Legal Reasons’ can be seen below. You can return whichever status code you wish by specifying it after the return directive. Ensure you restart NGINX for the changes to take effect.
location = /test.html {
return 451;
}
To ensure your NGINX configurations are correct before restarting, you should run the syntax checker below and receive a similar message to the following.
nginx -t
nginx: the configuration file /etc/nginx/nginx.conf syntax is ok
nginx: configuration file /etc/nginx/nginx.conf test is successful
You should then be safe to restart NGINX to begin testing.
sudo systemctl restart nginx
Protecting wp-admin with NGINX
The code below will allow you to permit access to the /wp-admin login page of your site via any IP address you specify. It will deny access to the IPs that aren’t existing in the list. Add the following code to your WordPress site’s NGINX configuration file and replace the example IP with the one you’re wishing to permit access to.
location /wp-admin {
allow 192.168.1.254;
deny all;
}
To ensure your NGINX configurations are correct before restarting, you should run the syntax checker below and receive a similar message to the following.
nginx -t
nginx: the configuration file /etc/nginx/nginx.conf syntax is ok
nginx: configuration file /etc/nginx/nginx.conf test is successful
You should then be safe to restart NGINX to begin testing.
sudo systemctl restart nginx
Enable/Disable Directory Browsing using NGINX
By default, NGINX’s configuration doesn’t permit directory browsing.
If you’re wanting to allow directory browsing for a specific directory, you’ll need to add the following code to your NGINX configuration file and use the autoindex directive.
location /yourdirectory {
autoindex on;
}
To ensure your NGINX configurations are correct before restarting, you should run the syntax checker below and receive a similar message to the following.
nginx -t
nginx: the configuration file /etc/nginx/nginx.conf syntax is ok
nginx: configuration file /etc/nginx/nginx.conf test is successful
You should then be safe to restart NGINX to begin testing.
sudo systemctl restart nginx
Changing PHP Memory Limits using NGINX
Your site’s PHP memory limits can be changed either in your NGINX configuration file or within your site’s PHP-FPM pool configuration file. Below you can see the code you’ll need to add in each file respectively.
NGINX Site Configuration File
#Set this under your other fastcgi_param settings
fastcgi_param PHP_VALUE "memory_limit = 256M";
Make sure to restart NGINX for the changes to take effect.
systemctl restart nginx
PHP-FPM Pool Configuration File
#Add this to yourdomain.co.uk.pool.conf
php_admin_value[memory_limit] = 256M
Make sure to restart PHP-FPM for the changes to take effect.
systemctl restart php-fpm
You can test the new memory limit has been applied successfully by creating an info.php page and visiting it in your browser. Then simply Ctrl+F memory_limit and the new value should have been applied.

Classification: Public
Last saved: 2019/11/27 at 16:03 by