
This guide is an overview of a few of the basic tasks you can perform within a Unix/Unix-Like operating system such as Linux and its various other distributions after using SSH to access your system’s terminal.
How to create users/groups
How to change permissions
Rename folders/directories/files
How to create new sudo logins
How to zip/unzip files
Basic Commands
ls – lists all files
cat – types the contents of the file specified to stdout
touch – creates an empty file
rm – removes a file
cp – copies a file
mv – moves a file
find – searches for a file
cd – change directory
mkdir – make directory
pwd – print working directory
rmdir – remove directory
vi/vim – command line text editor
exit/logout – closes the current connection/session when using SSH
How to Add a New User
Adding a new user on a Linux system is quite simple. All you need to do is use the useradd command followed by the username you wish to use. It will need to be unique and cannot be the same as a user of the same name.
useradd youruser
This will also create and populate a home directory under the name of the user (/home/yourusername/) and set permissions and ownership for the directory appropriately. It will also edit some of your files in your etc directory, adding the newly created user account (passwd, group, shadow, gshadow).
Once you’ve added the user, you’ll need to create a password for it in order to unlock it. You can use the passwd command to do this.
passwd youruser
You should then be prompted with the following, where you will need to enter your password and then retype it to confirm:
Changing password for user youruser.
New UNIX password:
Retype new UNIX password:
passwd: all authentication tokens updated successfully.
Once you’ve added the new user, you can check everything has been created successfully using the cat and grep commands, specifying your /etc/passwd file.
cat /etc/passwd | grep youruser
You should be shown something along the following lines.
youruser:x:1001:1001::/home/youruser:/bin/bash
How to Add a New Group
Adding a new group is just as simple as adding a new user as shown above. You will need to use the groupadd command to create a new group under the name you wish to use.
groupadd yourgroup
To add a user to this group, you will need to use the usermod command,
usermod -a -G yourgroup youruser
To check this has been done successfully, you can use the groups command to show current user’s assigned to a specific group.
groups youruser
You should see something similar to the following:
youruser : youruser yourgroup
This confirms youruser has been added to yourgroup successfully.
Overview of Permissions
Linux uses two authorisation levels, ownership and permissions, to help provide the security required to operate safely on a multi-user operating system. There are three different sets of ownership on Linux systems; user, group and other. You also have the ability to control access to files/directories for those 3 owners using the read, write and execute permissions, as shown below.
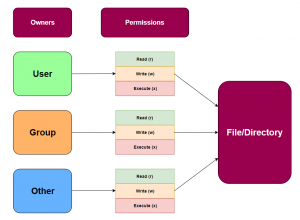
You can see an example of what permissions will look like in your terminal by using the command ls -la in your root directory. It should be in a similar format as the one shown below.
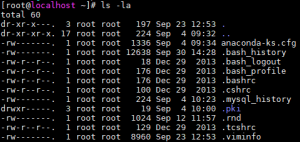
You can see the permissions on the far left of the terminal’s output. E.g. -rw-r–r–. These letters in this format are how the system represents permissions. You can understand them using the following guideline which shows what each symbol represents.
r = read – grants the ability to read a file. Without this, contents, file type, size, ownership and permissions are unable to be viewed. If a directory has read-only permissions for your user, you’ll be able to see the names of the files, but that is all.
w = write – grants the ability to modify a file. For a directory, it will allow you to create, delete, and rename files within (only if the execute permission is also permitted).
x = execute – grants the ability to execute a file. Permits the user/operating system to run executable programs. For directories, it gives the ability to access file contents as well as meta-information as long as the read permission is also set.
– = no permission – this indicates the permission in the corresponding slot is missing and not permitted.
– = at the start of the permissions set, this means the permissions are for a file.
d = at the start of the permissions set, this means the permissions are for a directory.
So the above example -rw-r–r–. would mean the permissions are set for a file and the user has read and write access, the group has read only access and others have read only access as well.
How to Change Permissions
The changing of permissions on Linux systems can be performed using the chmod command, which is an abbreviation for change mode.
On Unix/Unix-like systems, permissions can also be displayed in base-8 (octal) format, which means they will be displayed and configured in a minimum of three digits (a number representing each of the user, group and other permissions), but sometimes will be shown in four. Each of these digits represents a set amount of bits assigned to each given permission.
read = 4 added onto the total bits.
write = 2 added onto the total bits.
execute = 1 added onto the total bits.
Chmod can use these to set file permissions, so you’ll need to understand the permissions in octal/numeric form as well as symbolic to be able to use the chmod command efficiently (you can also set permissions in symbolic form if you wish, but this part of the guide will only show how to perform this using chmod with the numeric form). There is a handy table below outlining what each number represents permissions wise, with the symbolic notation also represented in the third column.
| Numeric | Permission Type | Symbolic |
| 0 | No Permissions | — |
| 1 | Execute | –x |
| 2 | Write | -w- |
| 3 | Write and Execute | -wx |
| 4 | Read Only | r– |
| 5 | Read and Execute | r-x |
| 6 | Read and Write | rw- |
| 7 | Read, Write and Execute | rwx |
Common/recommended permissions you’ll see when it comes to websites are the following:
| Numeric | Permission Type | Symbolic |
| 755 (Recommended for website directories) | User: Read, Write, Execute
Group: Read, Execute Other: Read, Execute |
-rwxr-xr-x |
| 644 (Recommended for website files) | User: Read, Write
Group: Read Only Other: Read Only |
-rw-r–r– |
| 440 (Recommended for sensitive website files such as config files) | User: Read Only
Group: Read Only Other: No Permissions |
-r–r—– |
| 777 (Never recommended) | User: Read, Write, Execute
Group: Read, Write, Execute Other: Read, Write, Execute |
-rwxrwxrwx |
So now you know how permissions work and are displayed, you should be able to use the chmod command to set a file/directory’s permissions to whatever you wish.
chmod 644 yourfile.txt
Once you have done this, you can use the ls -l command to check the permissions for your file have been changed successfully.
ls -l yourfile.txt
You should see similar to below in your terminal, but with the name of your file and also your user:group being different.

Changing Ownership and Group
If you notice the user/group is incorrect for the file/directory you’re wishing to change permissions for you can easily change these using the chown (change owner) and chgrp (change group) commands.
Change Owner
chown newuser yourfile.txt
Change Owner and Group
chown newuser:newgroup yourfile.txt
Change Group (chgrp)
chgrp yourgroup yourfile.txt
Renaming Folders and Directories
The renaming of file/directories is done most easily with the mv (move) command. You’ll need to have write permissions to the directory the files are in to rename a file located there. If the file/directory is a key system one, you will require root permissions to make any changes, so you’ll need to prepend sudo.
Rename Single Files
mv yourfile0.txt yournewfilename.txt
Rename Directory
mv yourdirectory yournewdirectoryname
You can also use the rename command if you wish, but you will require previous knowledge of regex (regular expressions) and perlexpr (perl expressions) to be able to use it effectively.
How to Create a New sudo User and Login as sudo User
Granting sudo permissions to a user can be seen the same as giving the user administrator privileges to perform tasks on the operating system. This allows the user to perform tasks only the root user would otherwise be able to perform.
New sudo User
adduser newsudouser

passwd newsudouser

usermod -aG wheel newsudouser
Existing User to sudo Privileges
usermod -aG wheel youruser
Login as sudo User
su - yoursudouser
Test with sudo Privileges
sudo ls -la /root
After inputting the above commands and then inputting your sudo user’s password when prompted, the file names and permissions for the /root directory should be listed successfully if the correct privileges have been provided. The /root directory is usually only accessible to the root user, so it is a good way to test this.
How to zip/unzip Files
Zipping and unzipping files is very simple within Linux. You can just use the zip program like you can within Windows operating systems. It uses the commands zip and unzip.
Simply enter the directory that contains the files you wish to zip up.
cd /path/to/your/files
Then run the zip command specifying what name you wish to call the zip file first and then the files you wish to zip into it.
zip yourzipname yourfile0.txt yourfile1.pdf yourfile2.jpg
You should then end up with a file called yourzipname.zip containing the above files.
To unzip this, you’d just use the unzip command.
unzip yourzip.zip
If you have used a program such as tar to compress your files, you’ll need to use the appropriate command to unzip it.
tar xvf yourfile.tar
This should decompress your .tar file in the current working directory. You can check this with the pwd command.

Classification: Public
Last saved: 2025/12/11 at 16:27 by