
phpList is a newsletter manager which allows you to add and manage users along with creating and sending email newsletters. A powerful and popular open-source mass mailing software, with thousands of daily users and nearly 3,000 downloads a week.
We’ll talk you through using phpList from installation to delivery:
- Manual Installation
- Configure General Settings
- Configs for Mail Relays
- Configure Attributes
- Create Lists
- Create subscribe pages
- Send a test E-Mail
- Setup for the Bulk Mailer
Manual Installation
1. You will need to download the source files to your local machine. The latest version of these files can be downloaded from Sourceforge or from the phpList website directly.
2. Extract the downloaded .zip file to a convenient location on your machine.
3. Upload your extracted source files within the lists folder via FTP to your hosting account.
4. Login to your hosting control panel and create your MySQL database and appropriate user permissions.
5. Using your favourite text editor, open up the file config.php and edit the following lines with your MySQL database information:
$database_host = "mysql.pipeten.co.uk";
$database_name = "Your_DB_Name";
$database_user = "Your_DB_User";
$database_password = "StrongPassword";
1.Save the config.php file and upload it to your web directory.
2. Visit the domain where you have uploaded phpList, eg. newsletter.yourdomain.co.uk/admin
3. Login using the default details, Username: Admin Password: phplist
4. Initialise the database by clicking on the initialise database link. Your tables are now begin created. Note this section may take a little while.
5. Once your database has been populated you will need to click the phpList setup link to continue with the configuration.
6. Change the default admin password, visit http://newsletter.yourdomain.co.uk/admin/?page=admin&id=1 .Change the default phplist password to a secure one, containing both letters and numbers.
7. Change phpList to live mode – You will ahve noticed the following message at the top of your installation “Running in testmode, no emails will be sent. Check your config file.”
- Using FTP, within your config directory download the config.php file to your local machine and open with your favourite editor.
- Find the line define (“TEST”,1); and change this to define (“TEST”,0);
- Save the config.php file and upload to your /config folder.
Configure General Settings
1. Visit the following url for the general configuration of your phpList software, http://newsletter.yourdomain.co.uk/admin/?page=configure
2. Here you will configure the basic system settings, when using Pipe Tens mass mailing service, these would be configured as follows:
- Website address : www.yourdomain.ext
- Domain Name of your server (mail) : mailer.yourdomain.ext
- Person in charge of this system : newsletter@[DOMAIN]
- Who gets the reports : newsletter@[DOMAIN]
- From email address for system messages : newsletter@[DOMAIN]
- Reply-to email address for system messages : newsletter@[DOMAIN]
Configs for Mail Relays
For low volume mailings in accordance with the mass mailing policy, you should configure phpList for webform or dwebform as follows:
1. Edit config/config.php within your phpList directory via FTP.
2. Locate the following lines/settings and ensure set as follows:
- define(“PHPMAILERHOST”,’webform.pipeten.co.uk’);
3. Optionally also set bounce collection:
- $bounce_mailbox_host = ‘mail.pipeten.co.uk’;
- $bounce_mailbox_user = ‘user@yourdomain.ext’;
- $bounce_mailbox_password = ‘themailboxpassword’;
For higher volume mailings in accordance with the mass mailing policy via the mass mailing service, you should configure phpList for the mass mailing service as follows:
4. Edit config/config.php within your phpList directory via WebShell or FTP.
5. Locate the following lines/settings and ensure set as follows:
- $bounce_mailbox_host = ‘mailer.yourdomain.ext’;
- $bounce_mailbox_user = ‘newsletter@mailer.yourdomain.ext’;
- $bounce_mailbox_password = ‘PasswordProvided’;
- define(“PHPMAILERHOST”,’mailer.yourdomain.ext’);
- $phpmailer_smtpuser = ‘newsletter@mailer.yourdomain.ext’;
- $phpmailer_smtppassword = ‘PasswordProvided’;
You may also wish to consider adding define(“EMAILTEXTCREDITS”,0); to config/config.php in order to remove the phpList logo from each mailing.
Configure Attributes
phpLists attributes are basically fields of information that you wish to collect e.g email address, first name, last name.
1. Within the admin panel, on the right hand side click Main Page then Attributes
2. Here you can create a new field, add the name and type of data, for example we will add a first name field.
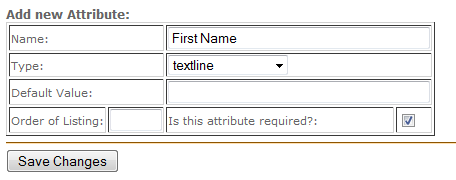
3. More can be added as desired to obtain more information from your users.
Create phpList lists
Now the important bit, the actual creating of your mailing lists.
1. Within the administration section using the right hand side menu click on lists, then at the bottom of the page add a list
2. Fill in the obvious details, ensure the click box is ticked to make the list active, make the Order for the listing 1 and give it a full description, eg. Monthly news letter. Click save.
Create subscribe pages
Now that the general settings are sorted and you’ve created the mailing list we want to create a way to capture peoples information with a subscribe page.
The attributes that we created earlier are shown on these pages, so you can collect specific information for your mailings. Please note, mailing lists and attributes have to be created before subscribe pages.
1. Within the administration section, using the right side menu click on subscribe pages, then at the bottom of the page click on add a new one.
2. You will now see your subscribe page creation forms with self explanatory titles like, Header, Footer, Thank you page etc
3. An important option on this page is Offer check box for HTML. This gives users the choice of receiving either plain text or html emails. Some email clients may not be able to support html emails.
4. The next important option is the display email confirmation box. By default this is displayed, so the user has to type their email twice to confirm their subscription.
5. Again the next two options are basic, Message they receive when they subscribe and Message they receive when they confirm their subscription change these to your desired messages.
6. Choose what attributes (the ones we created earlier) you wish to have included in the subscribe page.
7. Finally choose what list you wish to use, you can choose multiple lists here if you wish. Then click Save and Activate.
8. You will now be taken back to the subscribe pages section. Here you can view your newly created pages to see how your users would see them.
Send a test email
1. Login to your administration section, then using the right menu click send a message.
2. Fill in the relevant details, Subject, From, mail message and the email address you wish to send the test email to. Click Send Test Message. Note this email address must be in a list of previous subscribers.
3. The page will refresh with the message message saved.
Setup for the Bulk Mailer
1. Download your config.php file.
2. Open it up in your editor of choice and edit this value:
define('PHPMAILERHOST', 'mcXX.purelymx.com');
3. The above host (mcXX.purelymx.com) should be your Bulk Mailer server.
Note: Replace XX with your server number
4. Re-upload your config.php file and start using your Bulk Mailer!
Useful links
Pipe Ten Mass Mail Policy

Classification: Public
Last saved: 2023/07/06 at 10:55 by Jamie