
Web applications come in many different forms, however they all share one very important rule: Keep them up to date! There are many reasons for this however the most important reason is security. Technology moves fast, so do exploits on these technologies. Over the years we have seen many exploits which could have all been prevented by simply keeping the applications up to date. Exploits such as SQL injection, cross site scripting, Crypto currency miner injections are on the large part avoidable, by keeping security at your first priority. Use best practises and keep your applications up to date.
How to update my web application?
If you manually installed your web application please see the following guides for updating:
WordPress
-
- First backup your files and database in-case we need to revert this update.
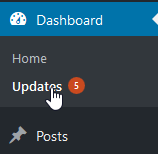
- Visit your WordPress dashboard at: http(s)://yourdomain.co.uk/wp-admin
- Select “Updates” in the top left, under “Dashboard”
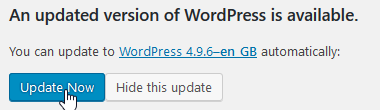
- If your WordPress version has an update available it will appear here. You then just need to click “Update Now”
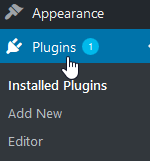
- Once core WordPress is updated you should also update your plugins. First select the plugins on the left panel:
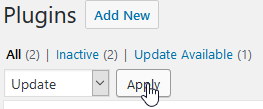
- In the bulk action in the top left select “Update”
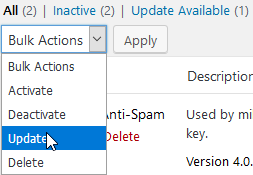
- Then select the check box to select all plugins to update:
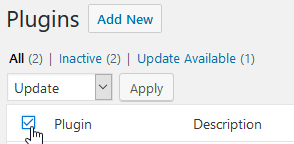
- Now hit “Apply” which will update all plugins.
- Have a good click around the updated site and make sure everything is functioning correctly.
Magento 2
This guide shows you how to upgrade Magento 2 through the in-built software updater. Depending on how you installed strong>Magento 2 this may not be the best way to upgrade. For more details please see the official Magento 2 documentation.
-
- First backup your files and database in-case we need to revert this update.
- Login to your Magento 2 admin dashboard at the URL you configured at install.
- Click System > Tools > Web Setup Wizard
- Select System Configuration
- Select System Upgrade on the left.
- Follow the on screen prompts to upgrade the installation.
- Have a good click around the updated site and make sure everything is functioning correctly.
Drupal
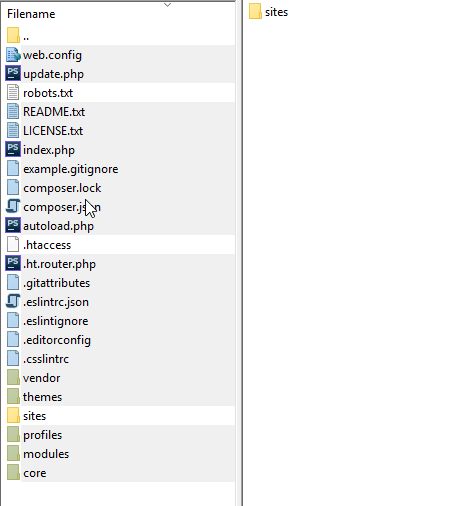
Using FTP, delete all folders/files apart from the sites folder and any other modified file for example .htaccess or robots.txt.

Upload the new update files, excluding the sites directory and any modified files that you don’t want to overwrite like .htaccess or robots.txt.
-
- If there have been any changes to the Drupal .htaccess and robots.txt, merge these with any modifications you may have made previously.
- Visit yourdomain.co.uk/update.php. This will finish the update.
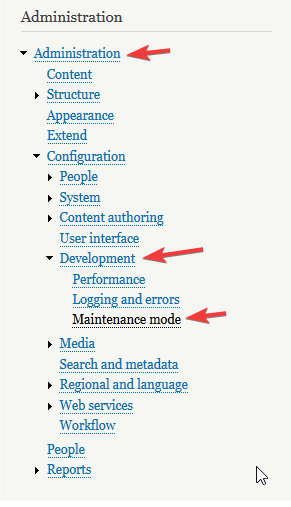
- Once the update is complete you should now disable maintenance mode.
- Have a good click around the updated site and make sure everything is functioning correctly.
Joomla!
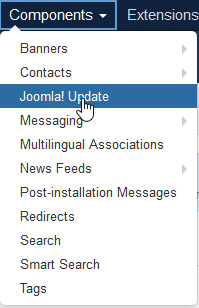
If there is an update available, select “Install the update”.
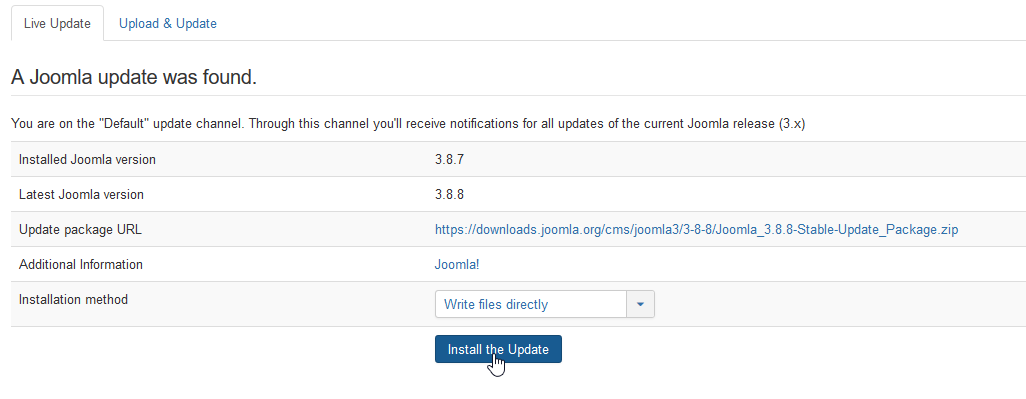
Joomla! should now be up to date. Have a good click around your site to check everything is working as it should be.

Typo3
-
- First backup your files and database in-case we need to revert this update.
- Visit http(s)://yourdomain.co.uk/typo3/install in your browser.
- Select the Update Wizard on the left menu.

- If you have an update available it should show a button to update Typo3.
- Once updated, have a good click around your site to check everything is functioning correctly.
Prestashop
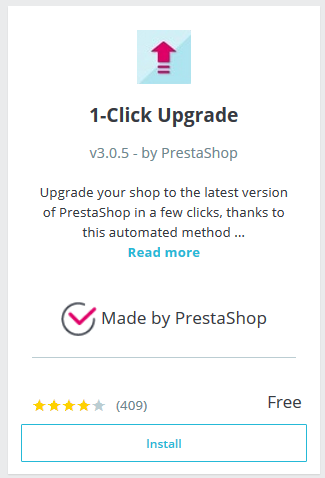
- Search for autoupgrade.

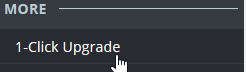
- Install the 1-click Upgrade module.
- A new module should be added on the left menu. Select 1-click Upgrade.
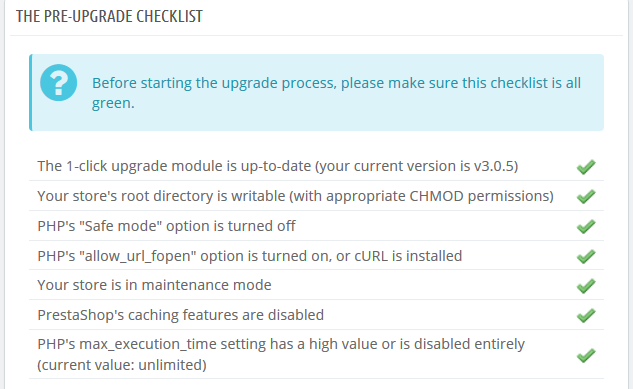
- Make sure all of the pre-requisites are checked/green. If they are not, follow the on screen prompts to fix these before continuing.
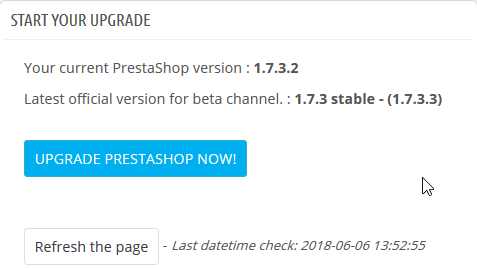
- Scroll down and select Upgrade Prestashop Now!
- Once the upgrade is finished, have a good click around your site and make sure it is acting as expected.
Cubecart
-
- First backup your files and database in-case we need to revert this update.
- Download the latest Cubecart release.
- Extract this release on your local PC.
- Use FTP to upload the extracted files into your installation directory/domain folder. Overwrite all existing files. (Any modified core files will be lost).
- Visit http(s)://yourdomain.co.uk/setup/ and select to Upgrade CubeCart
- Once this has completed, delete the setup folder using FTP.
- Have a good click around your site and make sure it is acting as expected.
Concrete5
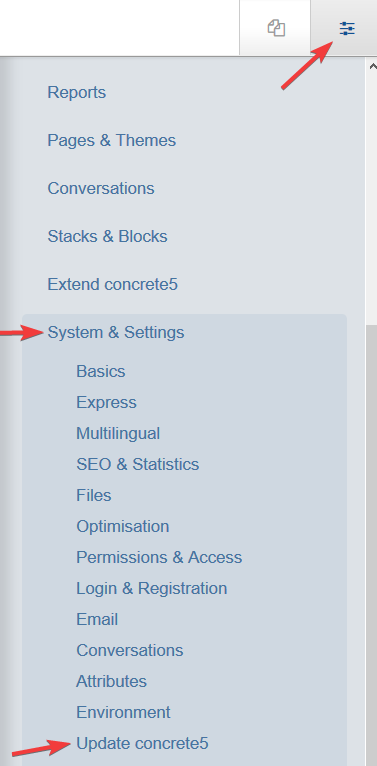
Click Check for Updates and if an update is available apply this update.

Have a good click around your site and make sure it is acting as expected.
Umbraco
-
- First backup your files and database (if the site utilises one) in-case we need to revert this update.
- Using FTP, upload and overwrite these directories from the new update, to your installation: /bin, /Umbraco and /Umbraco_Client.
- Check over any changes in these directories/config files and merge them with your installation: /Config, /Global.asax, web.config.
- Some packages make modifications to UI.xml and language files. You should check these changes and merge and them.
- Open your site in a browser and you should see an update screen. Follow the on-screen prompts to complete the update.
- Have a good click around your site and make sure it is acting as expected.
DotNetNuke
-
- First backup your files and database (if the site utilises one) in-case we need to revert this update.
- Download the DotNetNuke_Community_XX.XX.XX.UPGRADE.zip package of the latest stable release of DotNetNuke.
- Open your web.config and make sure autoupgrade is set to FALSE not TRUE
- Extract the contents of the upgrade package and upload this via FTP. (this will overwrite any modifications to core files you have made)
- Browse to http(s)://yourdomain.co.uk/install/install.aspx?mode=upgrade
- Follow any on screen prompts to finish the upgrade process.
- Have a good click around your site and make sure it is acting as expected.

Classification: Public
Last saved: 2023/06/23 at 15:18 by Jamie