
 By default, Joomla is set to use the servers definition of how it should log errors.
Despite this, it is often more helpful to enable debugging/error logging within the Joomla application itself, which will allow a more thorough insight into reasons why your site may not be functioning properly.
Joomla Debugging
The default plugin for Joomla that controls debugging provides important information that can assist in sorting out errors and improving the performance of your website. This part of the guide will show you how to enable the debugging console.
Method 1
1. Log in to the backend of your Joomla site.
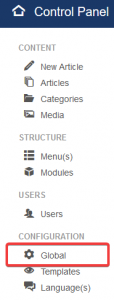
2. Go to Global Configuration on the far left of the control panel.
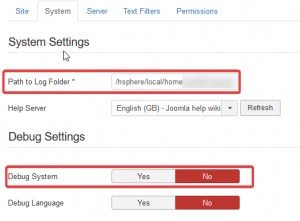
3. Select the System tab at the top of the page and then click Yes on the Debug System to enable it. You can also see the directory where your logs will be stored under the Path to Log Folder field.
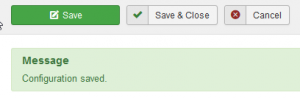
4. Click Save on the top left in order to save the new configuration.
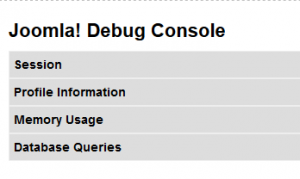
5. The Debug Console should now appear at the bottom of any of the pages you decide to visit on your website.
Method 2
1. Log in via FTP to gain access to the files within your Joomla installation.
2. Locate the configuration.php file within your Joomla domain’s directory
3. Edit the line around line 12
public $debug = '0'
4. Change the ‘0’ to a ‘1’ to enable debugging.
5. This should have enabled the Debugging Console, with it appearing as shown in Method 1.
Joomla Error Logging
Method 1
This method is particularly useful if you’re receiving a white screen and can’t get to the backend of your site.
1. Log in via FTP to gain access to the files within your Joomla installation.
2. Locate the configuration.php file within your Joomla domain’s directory.
3. Edit the line around line 23
public $error_reporting = 'default';
4. Replace ‘default’ with any of the following:
Default: Joomla will inherit error reporting defaults set in the server (usually in php.ini file).
None: Switch off the Error Reporting
Simple:Gives a basic report with warnings only about the fatal errors.
Maximum: Gives a full report with all the errors, warnings, notices, deprecated functions call, strict standards etc.
You’ll usually want to use Maximum if you’re receiving a white screen on the front or back end of your site.
Method 2
If you can get to the backend of your site, you can simply enable error logging this way.
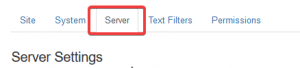
1. Go to the Global Configuration control panel.
2. Click the Server tab.
3. On the drop down menu next to Error Reporting, select the level of error reporting you wish to use.
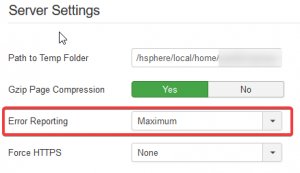
4. Click Save at the top left once you’ve selected the level of error reporting you wish to use.
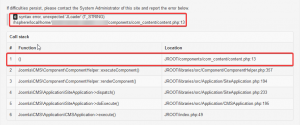
5. You should now be able to see errors when trying to troubleshoot your site.

Classification: Public
Last saved: 2019/08/16 at 14:00 by Jamie