
The web.config is a configuration file utilised by Windows servers to alter a websites functionality.
- Creating a web.config File
- Uploading your web.config via Filezilla
- Viewing the web.config in Filezilla
- Editing the web.config File in Filezilla
- web.config Useful Code
- Bad Bot Blocking
Create a web.config file
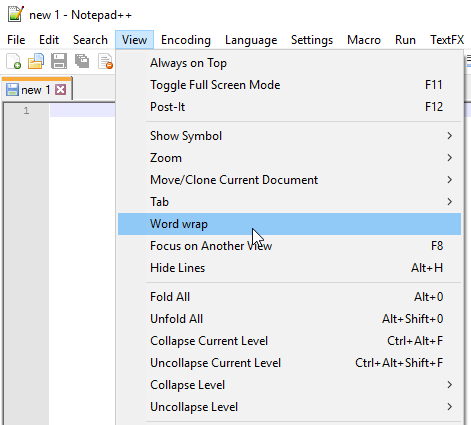
1. Open a text editor such as Notepad ++.
2. From the View menu, ensure that Word Wrap is unchecked.
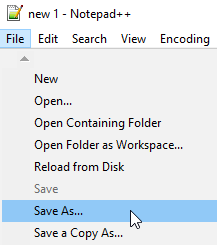
3. Click File > Save As.
4. Set the file type to All Types.
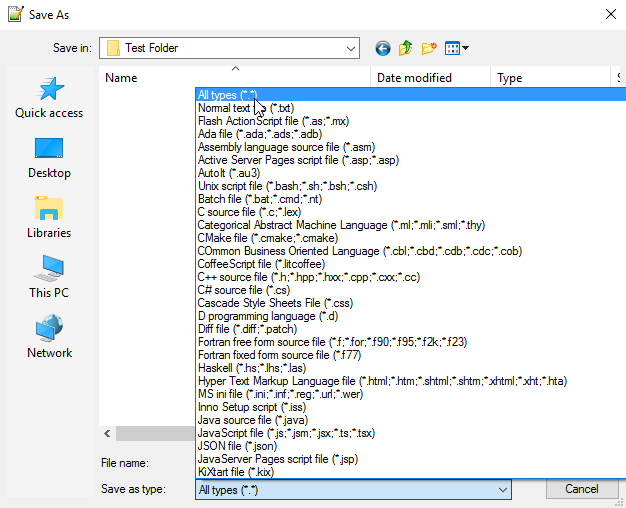
5. Name the file web.config and click Save.

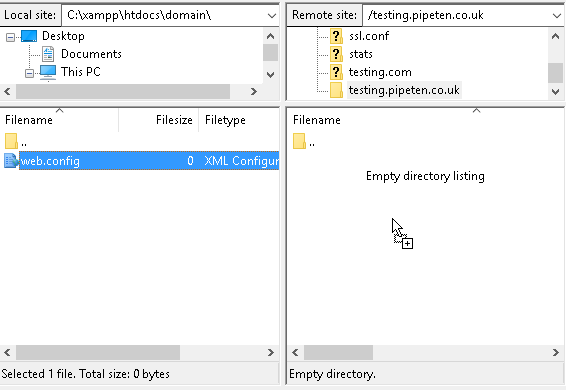
Uploading your web.config via Filezilla
1. If you do not have a copy already, download & install Filezilla.
2. Open Filezilla and connect to your ftp account.
3. From the left hand menu, open the directory that contains your web.config file.
4. From the right hand open the web directory you wish to upload the web.config file to.
Viewing the web.config in Filezilla
Web.config is a hidden file by default, so an FTP client must be configured to view hidden files in order to make future edits to the web.config file.
1. Open Filezilla and select Server > Force showing hidden files.
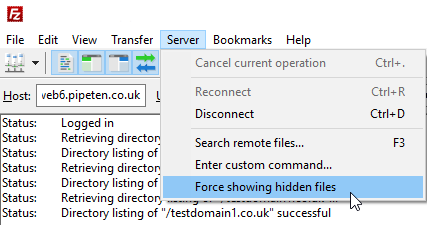
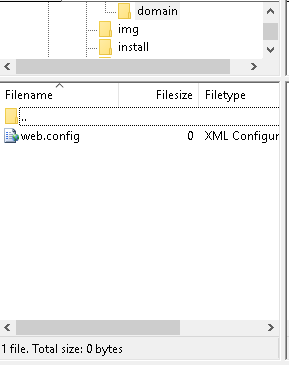
2. Your web.config will now be viewable in Filezilla.

Editing the web.config file in Filezilla
Once you have found the code you wish to implement in your web.config, you will need to place it into your file.
1. Open Filezilla and connect to your FTP account.
2. Navigate to the directory the contains your web.config file.

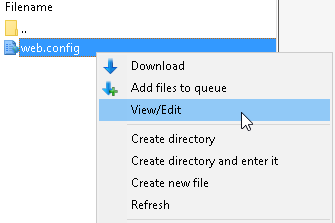
3. Right click the web.config file and select View/Edit to open the file in your default text editor.
4. Input the code you wish to implement on your domain and select File > Save.
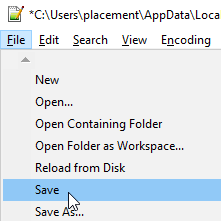
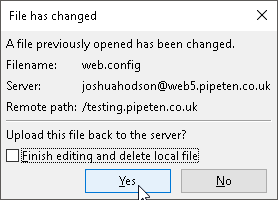
5. Within Filezilla a window prompt will appear. Select Yes to upload the changes made to your web.config file to the server.
Web.config Useful Code
Web.config files can be used to alter the configuration of your accounts Windows Server.
- Enabling Gzip in your web.config file
- Redirecting HTTP to HTTPS using web.config
- Protecting WP-Admin using Web.config
- Beating the web.config 250k limit
- Blocking referer link spam with web.config
- Caching static files with a web.config file
- Removing file extensions using a web.config file
- Using a web.config file to block IP addressess
- Canonical (preferred) 301 redirect with a web.config file
- Adding MIME types to a web.config file
Enabling Gzip in your web.config file
Gzip is a file format used for file compression and decompression. The most common text based files are HTML, CSS, XML and Javascript. The main thing about Gzip is that it helps to increase the speed of a website.
For example jquery-1.11.0.js uncompressed is 276 KB however with Gzip enabled it’s 82 KB, providing a compression of 70%. This can dramatically decrease the websites loading times and also helps you save bandwidth.
1. Create your web.config file.
2. Then add the following code:
//Gzip
 <httpCompression directory="%SystemDrive%\inetpub\temp\IIS Temporary Compressed Files">
  <scheme name="gzip" dll="%Windir%\system32\inetsrv\gzip.dll"/>
   <dynamicTypes>
    <add mimeType="application/javascript" enabled="true"/>
    <add mimeType="application/json" enabled="true"/>
    <add mimeType="application/rss+xml" enabled="true"/>
    <add mimeType="application/vnd.ms-fontobject" enabled="true"/>
    <add mimeType="application/x-font-opentype" enabled="true"/>
    <add mimeType="application/x-font-truetype" enabled="true"/>
    <add mimeType="application/x-font-ttf" enabled="true"/>
    <add mimeType="application/x-javascript" enabled="true"/>
    <add mimeType="application/xhtml+xml" enabled="true"/>
    <add mimeType="application/xml" enabled="true"/>
    <add mimeType="font/eot" enabled="true"/>
    <add mimeType="font/opentype" enabled="true"/>
    <add mimeType="font/otf" enabled="true"/>
    <add mimeType="image/svg+xml" enabled="true"/>
    <add mimeType="image/vnd.microsoft.icon" enabled="true"/>
    <add mimeType="message/*" enabled="true"/>
    <add mimeType="text/*" enabled="true"/>
    <add mimeType="*/*" enabled="false"/>
   </dynamicTypes>
   <staticTypes>
    <add mimeType="application/javascript" enabled="true"/>
    <add mimeType="application/json" enabled="true"/>
    <add mimeType="application/rss+xml" enabled="true"/>
    <add mimeType="application/vnd.ms-fontobject" enabled="true"/>
    <add mimeType="application/x-font-opentype" enabled="true"/>
    <add mimeType="application/x-font-truetype" enabled="true"/>
    <add mimeType="application/x-font-ttf" enabled="true"/>
    <add mimeType="application/x-javascript" enabled="true"/>
    <add mimeType="application/xhtml+xml" enabled="true"/>
    <add mimeType="application/xml" enabled="true"/>
    <add mimeType="font/eot" enabled="true"/>
    <add mimeType="font/opentype" enabled="true"/>
    <add mimeType="font/otf" enabled="true"/>
    <add mimeType="image/svg+xml" enabled="true"/>
    <add mimeType="image/vnd.microsoft.icon" enabled="true"/>
    <add mimeType="message/*" enabled="true"/>
    <add mimeType="text/*" enabled="true"/>
    <add mimeType="*/*" enabled="false"/>
   </staticTypes>
  </httpCompression>
 <urlCompression doStaticCompression="true" doDynamicCompression="true"/>
//End Gzip
The above code will compress text files, HTML, CSS , XML and JavaScript files.
Redirecting HTTP to HTTPS using web.config
1. Create your web.config file.
2. Place the following lines into your web.config file:
<configuration>
    <system.webServer>
        <rewrite>
            <rules>
                <rule name="Redirect to HTTPS" stopProcessing="true">
                <match url="(.*)" />
                <conditions>
                    <add input="{HTTPS}" pattern="^OFF$" />
                </conditions>
                <action type="Redirect" url="https://{HTTP_HOST}/{R:1}" redirectType="Permanent" />
                </rule>
            </rules>
        </rewrite>
    </system.webServer>
</configuration>
The above lines will ensure any request to a domain using http:// will be redirected to https://
Why redirect to HTTPS?
One of the reasons to redirect your visitors over to HTTPS is due to Google now using this as a ranking indicator. We cover this in greater detail in our Google’s new SSL ranking blog post.
Using HTTPS also provides visitors with another layer of security, encrypting their communication with the website. This is highly recommended when the data being sent to your website need to be handled in a secure way, this includes but isn’t limited to bank account details and login details.
Protecting WP-Admin using web.config
1. Find out what your IP address is. You can do this by using Pipe Ten’s IP lookup tool
2. Create your web.config file.
3. Once you have done that, insert this code inside the file:
<configuration>
<system.webServer>
<security>
 <ipSecurity allowUnlisted="false">
 <clear/>
 <add ipAddress="192.168.0.1" allowed="true"/>
 </ipSecurity>
</security>
</system.webServer>
</configuration>
Simply replace the IP Address 192.168.0.1 with your own IP address and upload it to your WP-Admin folder in your FTP. This will now allow you sole access to the WP-Admin page.
You can add more IP’s by copying line 6 and replacing the IP.
Beating the 250k web.config 250k limit
To help us split up our config files we will be using the configSource option within the web.config file, below is a very basic web.config which has it’s own file setup for the connection string:
<?xml version='1.0' encoding='utf-8'?>
<configuration>
<connectionStrings configSource="connections.config"/>
</configuration>
Now as well as the web.config file, we also have a file named connections.config, this is where the connection string details are stored, an example of this can be seen below:
<?xml version="1.0"?>
<connectionStrings>
<add name="SiteSqlServer" connectionString="Data Source=HOSTNAME;Initial Catalog=DATABASENAME;User ID=USERLOGIN;Password=PASSWORD" providerName="System.Data.SqlClient"/>
</connectionStrings>
The above method can be used for the other sections of the web.config file as well.
Blocking referer link spam with web.config
Why would you block referer links?Most people have some form of analytics linked to their domain so they can see where their visitors are coming from. Spammers have now taken to using referer links to try getting you to visit their website.
Blocking the spam referer links
1. Create your web.config file.
2. Enter the following code:
<?xml version="1.0" encoding="utf-8" ?>
<configuration>
<system.webServer>
<rewrite>
<rules>
<rule name="Imported Rule 1">
<match ignoreCase="false" url=".*"/>
<conditions logicalGrouping="MatchAny">
<add input="{HTTP_REFERER}" pattern="^http://.*domain\.com"/>
<add input="{HTTP_REFERER}" pattern="^http://.*domain2\.co.uk"/>
</conditions>
<action statusCode="403" statusDescription="Forbidden" statusReason="Forbidden" type="CustomResponse"/>
</rule>
</rules>
</rewrite>
</system.webServer>
</configuration>
The above web.config stops two example spam referer’s, the first one being domain.com and the second one being domain2.co.uk. The web.config also works for any subdomains for both of the domains.
A request that has one of the two domains as its referer link will get a 403 repose back from the server.
You can add new referer’s to the list by adding another line like the one below:
<add input="{HTTP_REFERER}" pattern="^http://.*domain3\.org"/>
The following line would block referers from the domain domain3.org and any sub domains.
Caching static files with a web.config file
What to do
Enabling static file caching is very simple, all it requires is a few lines adding within the section of your web.config file. Below we have provided an example to cache the static content for 14 days:
<system.webServer>
<staticContent>
<clientCache cacheControlMaxAge="14.00:00:00" cacheControlMode="UseMaxAge"></clientCache>
</staticContent>
</system.webServer>
You can set the cache max age to anything you would like, the key line and format can be seen below:
CacheControlMaxAge = <days>.<hours>:<min>:<sec>
Why would you want to cache the static content for your domain?
When someone browses to your domain they have to download all its resources, this includes static web pages, images, any media clips etc. This happens each time they visit your domain and uses up bandwidth to do so, caching the static content helps prevent unneeded bandwidth usages
Is there any downside to caching your static content?
If your domains content changes frequently and you have set cacheControlMaxAge high this will cause people revisiting your site to possible see older content on your domain dude to the cache content.
Removing file extensions using a web.config file
In the following example we are going to be removing the .html extension from our pages. This can be edited, just change the text html on line 13 to your desired extension, eg, asp, aspx, php.
1. Create your web.config file.
2. Enter the following code:
<configuration>
<system.webServer>
<rewrite>
<rules>
<rule name="removehtml" enabled="true">
<match url=".*" negate="false" />
<conditions>
<add input="{REQUEST_FILENAME}" matchType="IsFile" negate="true" />
<add input="{REQUEST_FILENAME}" matchType="IsDirectory" negate="true" />
<add input="{URL}" pattern="(.*)\.(.*)" negate="true" />
</conditions>
<action type="Rewrite" url="{R:0}.html" />
</rule>
</rules>
</rewrite>
</system.webServer>
</configuration>
That’s it, now your pages will be accessible without using the .html extension.
Using a web.config file to block IP addresses
1. Create your web.config file.
2. I will break this into 2 parts, blocking specific IP addresses and blocking all access and only allowing specific IP addresses.
-
-
- Blocking specific IP addresses
-
<security>
   <ipSecurity allowUnlisted="true">
       <clear/>
       <add ipAddress="10.0.0.1"/>
   </ipSecurity>
</security>
-
-
- Deny all, but allow specific IPs or networks
-
<security>
    <ipSecurity allowUnlisted="false">
        <clear/>
        <add ipAddress="127.0.0.1" allowed="true"/>
        <add ipAddress="10.0.0.1" allowed="true"/>
    </ipSecurity>
</security>
Canonical (preferred) 301 redirect with a web.config file
If your website can be reached from more than one URL, for example http://yourdomain.co.uk/home or http://home.yourdomain.co.uk, for SEO (Search Engine Optimisation) purposes it is better to just pick one of these URLs as the preferred way to access your website.
1. Create your web.config file.
2. Enter in the following code:
<configuration>
<system.webServer>
<rewrite>
<rules>
<rule name="Redirect to WWW" stopProcessing="true">
<match url=".*" /> <conditions> <add input="{HTTP_HOST}" pattern="^domain.com$" />
</conditions>
<action type="Redirect" url="http://www.domain.com/{R:0}" redirectType="Permanent" />
</rule>
</rules>
</rewrite>
</system.webServer>
</configuration>
3. Replace domain.com in the above code with your domain name and save within the configuration section of your web.config file.
Adding MIME types to a web.config file
Some media types require adding MIME types to your Web.config file to support playing. This is because this content is not served by IIS by default and needs to be added to support serving these.
1. Create your web.config file.
2. Enter in the following code:
<?xml version="1.0"?>
<configuration>
  <system.webServer>
    <staticContent>
      //We will be putting our MIME types here.
    </staticContent>
  </system.webServer>
</configuration>
3. Between the two staticContent’s add your required MIME types. Please see the example below:
<?xml version="1.0"?>
<configuration>
  <system.webServer>
    <staticContent>
      <mimeMap fileExtension=".webm" mimeType="video/webm" />
      <mimeMap fileExtension=".mp4" mimeType="video/mp4" />
      <mimeMap fileExtension=".m4a" mimeType="video/mp4" />
    </staticContent>
  </system.webServer>
</configuration>
Bad Bot Blocking
This part of the guide will help show you how to prevent unwanted bots from crawling your site using your Web.config file.
First, you’ll need to find or create your Web.config file over FTP using your preferred FTP client. Depending on your application, the code may look a little different, but should be able to be put in a similar place without being too dependent on which application you’re using.
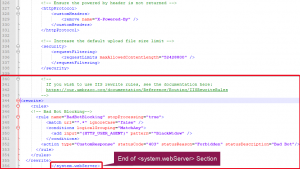
Place the code below towards the bottom of the <system.webServer> section of your Web.config file. You can see an example of where the intended location is in the screenshot below. This was performed on an Umbraco website, so the code may look a little different to your own.
<rewrite>
    <rules>
    <!-- Bad Bot Blocking-->
      <rule name="BadBotBlocking" stopProcessing="true">
          <match url="^.*" ignoreCase="false" />
          <conditions logicalGrouping="MatchAny">
            <add input="{HTTP_USER_AGENT}" pattern="^NameofBotHere" />
          </conditions>
        <action type="CustomResponse" statusCode="403" statusReason="Forbidden" statusDescription="Bad Bot"/>
      </rule>
    </rules>
  </rewrite>
Once you’ve done this, upload your Web.config file with the new code within to your website’s root directory.
You can add multiple lines of the <add input=”{HTTP_USER_AGENT}” pattern=”^NameofBotHere” /> code specifying different bot/crawler names if you have a problem with more than one.
Testing the Bot is Blocked
If you’re not sure whether the code is correct and doing what it should be doing, you can check this using a feature within popular web browsers that allows you to spoof your User Agent.
The browser used in this example is Google Chrome and Chrome’s Dev Tools is what allows you to perform the testing.
1. Open your web browser and browse to your website.
2. In Chrome, press F12 or Ctrl + Shift + I to bring up the Dev Tools Console. If you’re on a device that runs MacOS, this would be Command(⌘) + Option(⌥) + I.
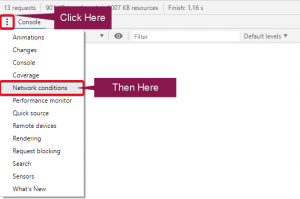
3. Click on the three vertical dots shown in the image below above the Console to bring up some additional tools. Click on the Network conditions option.
4. You’ll then be shown a menu where you can enable/disable Caching, Network Throttling or automatic User Agent selection. You’ll want to untick the Select automatically box to allow you to input your own User Agent.
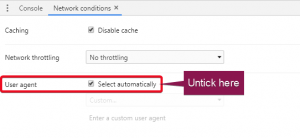
5. Once this has been unticked, you should be able to select a specific User Agent to use from the drop down menu. You’ll need to select Custom if you wish to input your own to replicate the bot you’re trying to block.
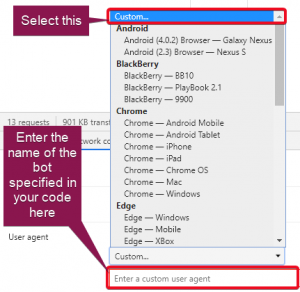
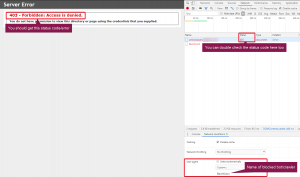
6. After inputting your custom user agent you wish to test with, press Ctrl + F5 to perform a hard refresh of your website. This should show a 403 status code mentioning how access has been forbidden. If your site still loads or shows a 500 error, you will need to do some troubleshooting.
This is a very good way to prevent bots/crawlers from taking up your bandwidth/traffic limits on your hosting account. Leaving this not monitored could cost you a hefty bill if not dealt with promptly. Blocking bad bots/crawlers is also a good security practice to ensure your site isn’t being crawled for vulnerabilities, as well as other information that can be used maliciously. This includes things such as email addresses, phone numbers and vulnerable form URLs.

Classification: Public
Last saved: 2021/07/29 at 14:37 by Jamie